I didn’t notice myself getting older; it snuck up on me in many ways. Similar to watching children grow up, it’s a slow and subtle process.
However, unlike observing children grow, my return to light development work was quite shocking. Like many others, I started with BASIC on MS DOS, then moved on to Perl, briefly entertained the idea of becoming a C++ and Java developer (a quick glance at my profile will reveal how well that worked out for me), and eventually settled into the gentle scripting of a sysadmin. But throughout my journey, I did acquire one trait: I became lazy.
Trigger Warning for Developers: Prepare for Criminal Inefficiency that may cause an aneurysm.
In the past, when I used to develop, I would spend time setting up my Very Special* brand laptop with the necessary Perl modules. I would build virtual machines to replicate production environments and data services. And then, due to several misplaced semicolons, I would find myself mashing the save button 50 times an hour. When started using containers, I quickly retooled my workflows to be more container-based. It was great to have every module and customization be immutable and packaged. But now, every time I mashed that save button, I had to go through the following steps:
- Check in my code to github.
- Download the code on my docker host (don’t ask me why).
- Build and upload the image to dockerhub.
- Update my deployment to incorporate the new image (in a testing environment, of course!).
- Only to realize that I missed the Python equivalent of a semi-colon (which, I suppose, is a space).
The above process was maddening. However, I learned two crucial things when I attended a developer user group hosted by DevZero:
- VS Code has an SSH plugin
- There are tools available for Kubernetes service insertion.
Remote Development with VS Code
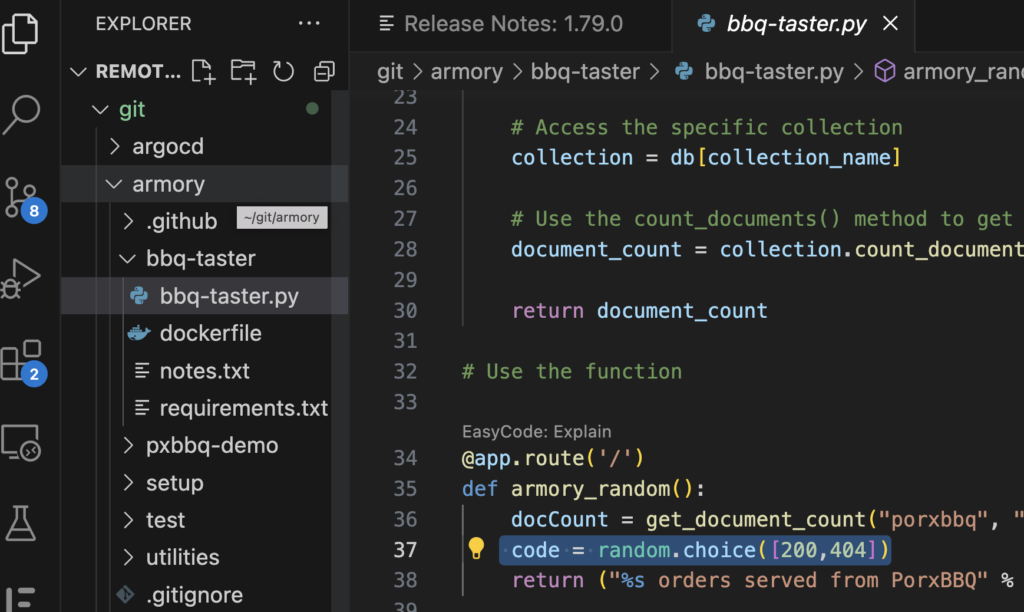
Remote Development with VS Code became a game-changer for me. I had a Linux host with all the necessary tools (kubectl, pxctl, etc.) installed and ready. I had been using this host for Kubernetes administration, but when all you have is VI (which, I must add, would make my father roll over in his grave, by which I mean his nice rambler in the country, as I type this), any complex change can be daunting.
For more information on using VS Code with SSH, refer to: https://code.visualstudio.com/docs/remote/ssh. However, after installing the plugin, you can follow these steps by pressing F1:
- Remote-SSH: Add New SSH host
- Remote-SSH: Connect to SSH host
Once the connection is complete, you will be able to navigate your remote server from the file browser, use git remotely, and use the remote terminal.

Of course, since many programs require a web browser for testing, remote-ssh also facilitates port tunneling through the SSH connection (similar to the “-L” option in SSH for experienced users). Whenever a program sets up a new port on my remote machine, a prompt appears, enabling me to forward the port and access it from my local laptop.

This only addresses the initial aspect of my problem. The subsequent issue is that I have a tendency to excessively press the save button while attempting to achieve proper spacing in Python (or nowadays, when I ask ChatGPT to write a Python script for me). Additionally, the program I was working on required a connection to MongoDB, which was running in my Kubernetes cluster. I could run Mongo locally, but it wouldn’t have a copy of my production data.
Telepresence – and other tools like it
Once again, I am fairly sure DevZero told me about this tool (or at least the concept) Telepresence.
Telepresence establishes a connection to a Kubernetes cluster, enabling connections to Kubernetes services and service insertion, which permits other Kubernetes objects to interact with my local program. This significantly simplifies the process of debugging.
kubectl config use-context MyStagingCluster
telepresence helm install
telepresence connect


And my Flask app has tested a connection to MongoDB successfully! To summarize:
- I did the above from my laptop (which ONLY has VSCode installed).
- I was connected to a Linux server in my house with all of the development tools I used
- My Linux server ran the code and was connected to an Azure AKS staging cluster that was running a copy of my production application.
- I then connected to my Flask application from my web browser on my laptop, which was connected to the Linux server with a dynamic SSH tunnel, which then connected to the MongoDB instance running in Azure.