Migrating a VM from vSphere to Openshift Virtualization

Portworx is a solution for data management on Kubernetes, but one area that surprised me was that our support extended to the KubeVirt project. Kubevirt is funded by RedHat, and a number of my customer have asked about the feasibility of using Portworx for virtualization.

KubeVirt is an open-source project, and although I configured the project on generic Kubernetes installations, RedHat Openshift has the best integration I have found so far. For this article I want to chronicle the first part of my journey: How would I move a virtual machine from my VMware environment to an Openshift Virtualization environment?

I started with an Openshift cluster that was running on virtual machines in my environment (using virtualization passthrough). I then installed Portworx (more on the why of that later).

VMware Migration Prerequisites

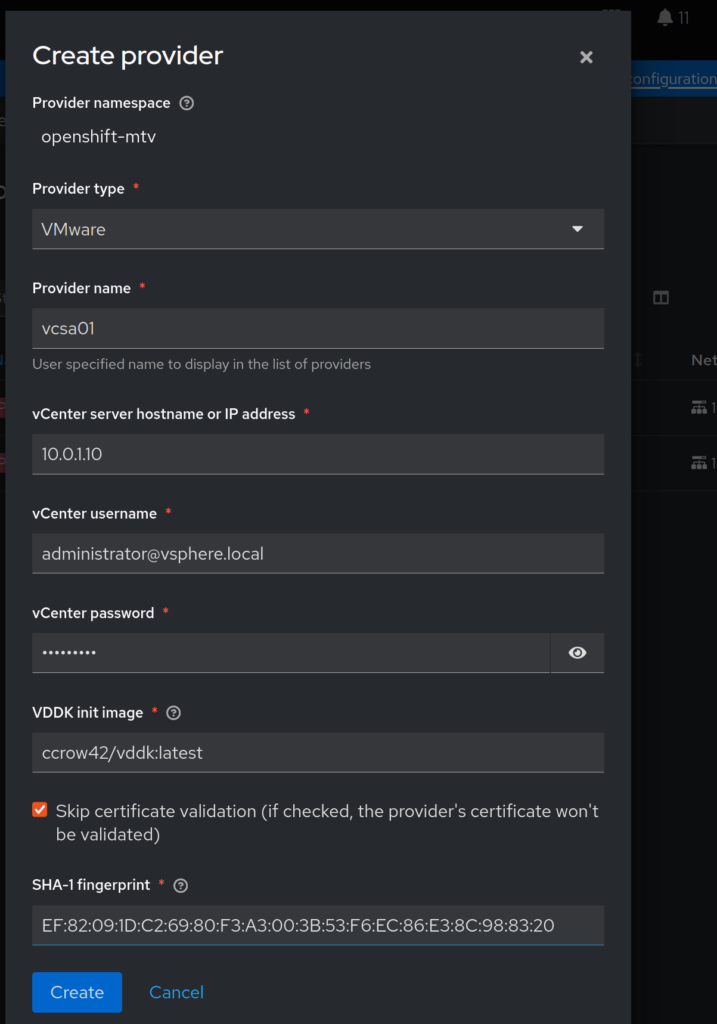
In order to convert VMware VMs, we will need to do two things. First, we need to capture the SHA1 of our vCenter certificates. Run the following to get your SHA1 fingerprint, you will need it later.

echo | openssl s_client -connect 10.0.1.10:443 | openssl x509 -noout -fingerprint -sha1
...
SHA1 Fingerprint=EF:82:09:1D:C2:69:80:F3:A3:00:3B:53:F6:EC:86:E3:8C:98:83:20

Next, we will need to build a quick container that contains the Virtual Disk Development Toolkit (VDDK). Ensure you have docker or podman (or something similar) and are connected to a registry. Download and extract the VDDK:

tar zxfv ./VMware-vix-disklib-7.0.3-20134304.x86_64.tar.gz

Create a new file called Dockerfile, it should be in the same directory that you extracted the above in to. Place the following content in the file:

FROM registry.access.redhat.com/ubi8/ubi-minimal
USER 1001
COPY vmware-vix-disklib-distrib /vmware-vix-disklib-distrib
RUN mkdir -p /opt
ENTRYPOINT ["cp", "-r", "/vmware-vix-disklib-distrib", "/opt"]

Now let’s build and push our new container to a repo:

docker build . -t ccrow42/vddk:latest
docker push ccrow42/vddk:latest

Obviously, replace your tag with your repo (or hell, use my uploaded image and save yourself some steps!)

Installing the Migration Toolkit

I should mention that this article is not designed to be a step-by-step tutorial but to simply document the overview and resources I have used.

The first step was to read through the documentation here. (Just kidding, but wanted to cite my sources)

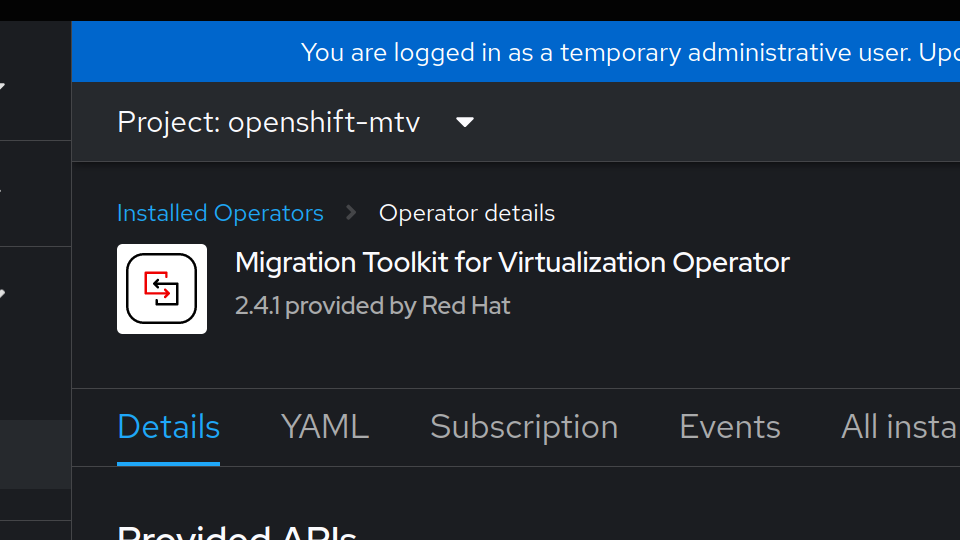
I then installed the operator. This installation will prompt you to install the forklift controller.

Reload your web interface and you will see a migration section on the menu. Let’s head over to the virtualization providers. Be sure change your project to openshift-mtv (if that is indeed where you installed the operator):

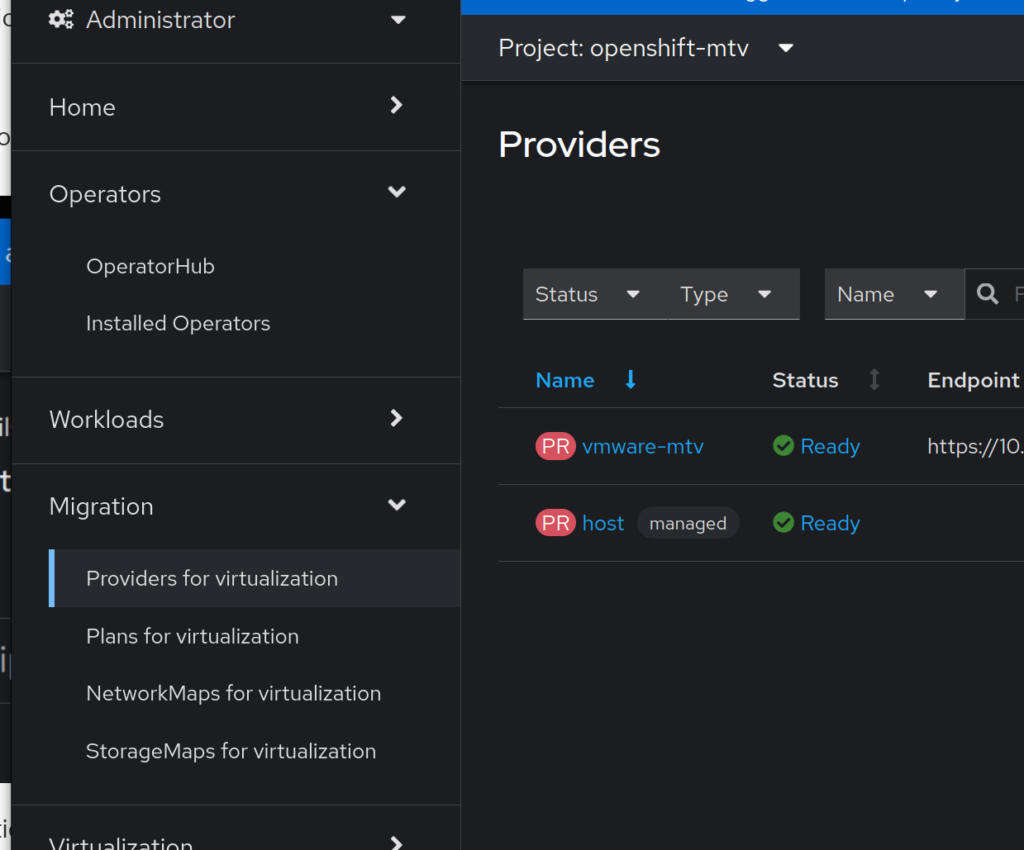
Let’s connect Openshift to VMware by clicking the Create Provider button:

Last, we simply need to create a Migration Plan, head over to the Plans for Migration section and select: Create Plan.

This process is straightforward, just select the source and destination. If you are not familiar with Portworx, just use the px-db storage class for now.

There are two ways of importing VMs, one is to use a cold migration, and the other a warm migration (which requires CBT).

Although this covered the migration steps, there are a few considerations around storage and networking that I will cover in a later article.

Why would I use Portworx Enterprise for this?

Portworx provides the same benefits to Opershift Virtualization as it does to other container workloads. The two that are very important:

  • Migration and DR: The ability to take a VM and move it to a new cluster, or to create DR plans for the VM.
  • Because Portworx supports RWX access on block devices, we enable a live migration of virtual machines.

How software development has changed in my life

I didn’t notice myself getting older; it snuck up on me in many ways. Similar to watching children grow up, it’s a slow and subtle process.

However, unlike observing children grow, my return to light development work was quite shocking. Like many others, I started with BASIC on MS DOS, then moved on to Perl, briefly entertained the idea of becoming a C++ and Java developer (a quick glance at my profile will reveal how well that worked out for me), and eventually settled into the gentle scripting of a sysadmin. But throughout my journey, I did acquire one trait: I became lazy.

Trigger Warning for Developers: Prepare for Criminal Inefficiency that may cause an aneurysm.

In the past, when I used to develop, I would spend time setting up my Very Special* brand laptop with the necessary Perl modules. I would build virtual machines to replicate production environments and data services. And then, due to several misplaced semicolons, I would find myself mashing the save button 50 times an hour. When started using containers, I quickly retooled my workflows to be more container-based. It was great to have every module and customization be immutable and packaged. But now, every time I mashed that save button, I had to go through the following steps:

  1. Check in my code to github.
  2. Download the code on my docker host (don’t ask me why).
  3. Build and upload the image to dockerhub.
  4. Update my deployment to incorporate the new image (in a testing environment, of course!).
  5. Only to realize that I missed the Python equivalent of a semi-colon (which, I suppose, is a space).

The above process was maddening. However, I learned two crucial things when I attended a developer user group hosted by DevZero:

  1. VS Code has an SSH plugin
  2. There are tools available for Kubernetes service insertion.

Remote Development with VS Code

Remote Development with VS Code became a game-changer for me. I had a Linux host with all the necessary tools (kubectl, pxctl, etc.) installed and ready. I had been using this host for Kubernetes administration, but when all you have is VI (which, I must add, would make my father roll over in his grave, by which I mean his nice rambler in the country, as I type this), any complex change can be daunting.

For more information on using VS Code with SSH, refer to: https://code.visualstudio.com/docs/remote/ssh. However, after installing the plugin, you can follow these steps by pressing F1:

  • Remote-SSH: Add New SSH host
  • Remote-SSH: Connect to SSH host

Once the connection is complete, you will be able to navigate your remote server from the file browser, use git remotely, and use the remote terminal.

Of course, since many programs require a web browser for testing, remote-ssh also facilitates port tunneling through the SSH connection (similar to the “-L” option in SSH for experienced users). Whenever a program sets up a new port on my remote machine, a prompt appears, enabling me to forward the port and access it from my local laptop.

This only addresses the initial aspect of my problem. The subsequent issue is that I have a tendency to excessively press the save button while attempting to achieve proper spacing in Python (or nowadays, when I ask ChatGPT to write a Python script for me). Additionally, the program I was working on required a connection to MongoDB, which was running in my Kubernetes cluster. I could run Mongo locally, but it wouldn’t have a copy of my production data.

Telepresence – and other tools like it

Once again, I am fairly sure DevZero told me about this tool (or at least the concept) Telepresence.

Telepresence establishes a connection to a Kubernetes cluster, enabling connections to Kubernetes services and service insertion, which permits other Kubernetes objects to interact with my local program. This significantly simplifies the process of debugging.

kubectl config use-context MyStagingCluster
telepresence helm install
telepresence connect

And my Flask app has tested a connection to MongoDB successfully! To summarize:

  • I did the above from my laptop (which ONLY has VSCode installed).
  • I was connected to a Linux server in my house with all of the development tools I used
  • My Linux server ran the code and was connected to an Azure AKS staging cluster that was running a copy of my production application.
  • I then connected to my Flask application from my web browser on my laptop, which was connected to the Linux server with a dynamic SSH tunnel, which then connected to the MongoDB instance running in Azure.

Plexstack Part 5 – Installing Radarr

There are a couple more concepts I want to cover before turning folks loose on a github repo:

  1. Instead of a hostpath, we should be using a PVC (persistent volume claim) and PV (persistent volume).
  2. What if we need to give a pod access to an existing and external dataset?

Radarr (https://radarr.video/) is a program that manages movies. It can request them using a download client, and can then rename and move them into a shared movies folder. As such, our pod will need to have access to 2 shared locations:

  1. A shared downloads folder.
  2. A shared movies folder.

NFS Configuration

We need to connect to our media repository. This could directly mount the media server, or to a central NAS. In any case, our best bet is to use NFS. I won’t cover setting up the NFS server here (ping me in the comments if you get stuck), but I will mention how to connect to an NFS host.

This bit of code needs to be run from kubernetes node if you happen to use kubectl on a management box. If you have been following these tutorials and using a single linux server, then feel free to ignore this paragraph.

# Install NFS client
sudo apt install nfs-common -y

# edit /etc/fstab
sudo nano /etc/fstab
# /etc/fstab: static file system information.
#
# Use 'blkid' to print the universally unique identifier for a
# device; this may be used with UUID= as a more robust way to name devices
# that works even if disks are added and removed. See fstab(5).
#
# <file system> <mount point>   <type>  <options>       <dump>  <pass>
# / was on /dev/sysvg/root during curtin installation
/dev/disk/by-id/dm-uuid-LVM-QkcnzyIuoI6q532Z4OIYgQCxWKfPFEQM11kT2U143DtREAzGzzsoDCYbD2h7Ijke / xfs defaults 0 1
# /boot was on /dev/sda2 during curtin installation
/dev/disk/by-uuid/890c138e-badd-487e-9126-4fd11181cf5c /boot xfs defaults 0 1
# /boot/efi was on /dev/sda1 during curtin installation
/dev/disk/by-uuid/6A88-778F /boot/efi vfat defaults 0 1
# /home was on /dev/sysvg/home during curtin installation
/dev/disk/by-id/dm-uuid-LVM-QkcnzyIuoI6q532Z4OIYgQCxWKfPFEQMZoJ5IYUmfVeAlOMYoeVSU3WStycNW6MX /home xfs defaults 0 1
# /opt was on /dev/sysvg/opt during curtin installation
/dev/disk/by-id/dm-uuid-LVM-QkcnzyIuoI6q532Z4OIYgQCxWKfPFEQM1Vgg9WyNh823YnysItHcwA4kc0PAzrAq /opt xfs defaults 0 1
# /tmp was on /dev/sysvg/tmp during curtin installation
/dev/disk/by-id/dm-uuid-LVM-QkcnzyIuoI6q532Z4OIYgQCxWKfPFEQMRA3d1jDZr8n9R23N2t4o1yxCyz2hiD3q /tmp xfs defaults 0 1
# /var was on /dev/sysvg/var during curtin installation
/dev/disk/by-id/dm-uuid-LVM-QkcnzyIuoI6q532Z4OIYgQCxWKfPFEQMnhsacKjBubhXMyv1tK8D3umR3mnzSjbp /var xfs defaults 0 1
# /var/log was on /dev/sysvg/log during curtin installation
/dev/disk/by-id/dm-uuid-LVM-QkcnzyIuoI6q532Z4OIYgQCxWKfPFEQM1IyfBAleLuw7m0G3UC9KNLrtmVAodTqu /var/log xfs defaults 0 1
# /var/audit was on /dev/sysvg/audit during curtin installation
/dev/disk/by-id/dm-uuid-LVM-QkcnzyIuoI6q532Z4OIYgQCxWKfPFEQMsrZUFWfY77xrwFBu3vSgbUfnJIp3AKA6 /var/audit xfs defaults 0 1
/swap.img       none    swap    sw      0       0

#added nfs mounts to the end of the file
10.0.1.8:/volume1/movies /mnt/movies nfs defaults 0 0
10.0.1.8:/volume1/downloads /mnt/downloads nfs defaults 0 0

Lines 29 and 30 were added to the end of the file. Be sure to change the IP address and export path. Go ahead and mount the exports:

mount /mnt/movies
mount /mnt/downloads

PVC and Radarr configuration

Second, we don’t want to use host path under most circumstances, so we need to get in the habit of using a PVC with a provisioner to manage volumes. This will effectively make our architecture much more portable in the future.

A CSI driver allows automated provisioning of storage. Storage is often external to the kubernetes nodes, and is essential when we have a multi-node cluster. I would encourage everyone to read this article from RedHat. The provisioner we will be using is rather simple: it would create a path on the host and store files there. The outcome is the same, but the difference is how we get there. Go ahead and install the local provisioner:

# Install the provisioner
kubectl apply -f https://raw.githubusercontent.com/rancher/local-path-provisioner/v0.0.24/deploy/local-path-storage.yaml

# Patch the newly created storage class
kubectl patch storageclass local-path -p '{"metadata": {"annotations":{"storageclass.kubernetes.io/is-default-class":"true"}}}'

Now take a look at this manifest for rancher (as always, a copy of this manifest is out on github: https://github.com/ccrow42/plexstack):

apiVersion: v1
kind: PersistentVolumeClaim
metadata:
  name: radarr-pvc
spec:
  accessModes:
    - ReadWriteOnce
  resources:
    requests:
      storage: 10Gi
  storageClassName: local-path
---
apiVersion: apps/v1
kind: Deployment
metadata:
  name: radarr-deployment
  labels:
    app: radarr
spec:
  replicas: 1
  selector:
    matchLabels:
      app: radarr
  template:
    metadata:
      labels:
        app: radarr
    spec:
      containers:
        - name: radarr
          image: ghcr.io/linuxserver/radarr
          env:
            - name: PUID
              value: "999"
            - name: PGID
              value: "999"
          ports:
            - containerPort: 7878
          volumeMounts:
            - mountPath: /config
              name: radarr-config
            - mountPath: /downloads
              name: radarr-downloads
            - mountPath: /movies
              name: radarr-movies
      volumes:
        - name: radarr-config
          persistentVolumeClaim:
            claimName: radarr-pvc
        - name: radarr-downloads
          hostPath:
            path: /mnt/downloads
        - name: radarr-movies
          hostPath:
            path: /mnt/movies
---
kind: Service
apiVersion: v1
metadata:
  name: radarr-service
spec:
  selector:
    app: radarr
  ports:
  - protocol: TCP
    port: 7878
    targetPort: 7878
  type: LoadBalancer
---
kind: Ingress
apiVersion: networking.k8s.io/v1
metadata:
  name: ingress-radarr
  annotations:
    cert-manager.io/cluster-issuer: selfsigned-cluster-issuer #use a self-signed cert!
    kubernetes.io/ingress.class: nginx
spec:
  tls:
    - hosts:
        - radarr.ccrow.local #using a local DNS entry. Radarr should not be public!
      secretName: radarr-tls
  rules:
    - host: radarr.ccrow.local 
      http:
        paths:
          - path: /
            pathType: Prefix
            backend:
              service:
                name: radarr-service
                port:
                  number: 8181

Go through the above. At a minimum, lines 80 and 83 should be modified. You will also notice that our movies and download directories are under the /mnt folder.

To connect to the service in one of two ways:

  1. LoadBalancer: run ‘kubectl get svc’ and record the IP address of the radarr-service, then connect with: http://<IPAddress>:7878
  2. Connect to the host name (provided you have a DNS entry that points to the k8s node)

That’s it!

PlexStack Part 1.6 – Installing Plex

Due to the last post getting a bit length, I’m going to cover installing Plex in a separate post. However you get a Linux VM, you can simply log in to the box.

This is probably the worst time to tell people, but you can easily run Plex on Windows, but that would not allow you to run Plex on a Raspberry PI.

Log in to your VM.

Next, we need to get the plex installation. Head over to plex.tv and select linux, and click the “Choose Distribution” option.

We are now going to do something tricky: Right-click on the Ubuntu Intel/AMD 64-bit or the Ubuntu ARMv8 (if you use Raspberry PI) and select “Copy Link”. After all, we want the software on our linux box!

If you haven’t already, get an application called putty. This will allow you to connect to a terminal of your new Linux server, and paste commands most importantly! Launch the app:

Plug in that IP that you wrote down

And then type in your username and password at the prompt.

At the prompt, let’s download and install Plex:

#get the plexmediaserver package
wget https://downloads.plex.tv/plex-media-server-new/1.28.0.5999-97678ded3/debian/plexmediaserver_1.28.0.5999-97678ded3_amd64.deb

#install plex
sudo dpkg -i plexmediaserver_1.28.0.5999-97678ded3_amd64.deb

Keep in mind that the first time you run a command with sudo (which allows you to become an administrator for just that command) you will have to type your same password in again.

You are set! Plex is done! Access it with: HTTP://<YOURIPADDRESS>:32400/web

Getting media over is a separate task. It can be as simple as getting a drive from Costco. Consider formatting the drive on the Linux machine and transferring data using a tool like WinSCP.

Drop a comment if you get this far and I can update the post.

PlexStack Part 1.5 – Installing Ubuntu and Plex Media Server

An earlier post sparked enough questions from folks that I figured I would write a separate article: If I just want a Plex server, how would I go about installing that?

So far, my posts have assumed that my readers have a degree of skill using Linux, and that they were able to install a Linux server fairly easily. Not everyone falls in to the above category, so I figured I would write a quick post to hopefully point people in the right direction.

What do I need to set up a linux server?

The short answer is: a place to install a linux server. This could be any of the following:
– A Raspberry PI
– Running as a virtual machine on your desktop (you should have a bit of ram for this!)
– An old computer or laptop you have lying around

I will cover each of these to hopefully provide some resources

A Raspberry PI

Getting Linux installed on a Raspberry PI is probably the simplest out of all the above options. You will of course need a Raspberry PI as well as a Power Supply and SD card (look for a bundle in the store if it is your first time doing this). You will also need a way to put Linux on the SD card for the Raspberry PI to boot, consider something like this

Once you have the parts, plug the SD card in to the USB adapter. Download the following program: https://www.raspberrypi.com/software/. This program will download and install Raspberry PI OS to the SD card. Launch the application, and select “Choose OS”. I would select “Raspberry PI OS (other)” and then “Raspberry PI OS Light” so we don’t install a desktop. You can install a desktop later if you would like, but getting comfortable with the CLI on Linux is essential.

Next, select the SD card device and click “Write”. You can then plug in the SD card and power on the Raspberry PI.

Running on a Virtual Machine

Because I run ESXi and VMware workstation at home, I’m going to have the least info on how to do this, but I would recommend installing VirtualBox on your PC. This will allow you to create a virtual machine:

The above is an example of a virtual “hardware” configuration

However you arrive at it, you can see that we connect a “virtual” CD/DVD drive. You can get the .ISO file here: https://ubuntu.com/download/server.

You will also need to ensure that your network type is set to “bridge” so that other computers can access the VM (and therefor, your plex server)

Install on an old desktop or laptop

In order to install Linux on an old computer, we will need to boot from some installation media. Grab an old USB drive and download Rufus and Ubuntu.

Rufus is a tool that writes an ISO to a USB drive so you can boot your computer from the USB drive to install Linux. Keep in mind that installing Linux is DESTRUCTIVE to your old computer. Fire up Rufus and point it to your ISO file and your USB drive.

Insert the USB drive and reboot your computer (keep in mind that you may need to tell your computer to boot from the USB drive, this can usually be done by pressing F11 or F12 when the computer first powers on, but it depends on the computer).

Install Linux (Finally)

We can now run through the Linux install (unless you choose to use a raspberry PI, then skip this section).

Pick your language
Don’t bother updating the installer
Write down this IP address! This is how you will get to your Plex server and SSH
If you don’t know if you are running a proxy, you aren’t
Use the defaults here
Set a computer name, username, and password. Be sure to document it!
Check the box to install the SSH server

That is it, the server will reboot and you should be able to log in using a keyboard and mouse.

This post is getting long, so I’m going to save the plex install for the next post.

Deploying Rancher clusters

Update January 5th 2023

We all get older and wiser, and although the below procedure works, a co-worker asked me: “Why not just use the cloud init image?” Information and downloads can be found here.

  • Grab the OVA
  • Deploy the OVA to vSphere
  • Mark it as a template

The rest of the article continues…

After a long while of playing with templates, I finally have a working configuration that I am documenting to ensure that I don’t forget what I did.

Step 1: packer

In trying to get a usable image, I ended up using packer following this tutorial: https://github.com/vmware-samples/packer-examples-for-vsphere. No dice, so after ensuring I had all of the packages added from here: https://ranchermanager.docs.rancher.com/how-to-guides/new-user-guides/launch-kubernetes-with-rancher/use-new-nodes-in-an-infra-provider/vsphere/create-a-vm-template, the only missing packages were the growpart.

I tried prepping the template from the above, but ended up using the following script: https://github.com/David-VTUK/Rancher-Packer/blob/main/vSphere/ubuntu_2204/script.sh

# Apply updates and cleanup Apt cache

apt-get update ; apt-get -y dist-upgrade
apt-get -y autoremove
apt-get -y clean
# apt-get install docker.io -y

# Disable swap - generally recommended for K8s, but otherwise enable it for other workloads
echo "Disabling Swap"
swapoff -a
sed -i '/ swap / s/^\(.*\)$/#\1/g' /etc/fstab

# Reset the machine-id value. This has known to cause issues with DHCP
#
echo "Reset Machine-ID"
truncate -s 0 /etc/machine-id
rm /var/lib/dbus/machine-id
ln -s /etc/machine-id /var/lib/dbus/machine-id

# Reset any existing cloud-init state
#
echo "Reset Cloud-Init"
rm /etc/cloud/cloud.cfg.d/*.cfg
cloud-init clean -s -l

and I was off to the races… to only hit another problem.

Troubleshooting

I found the following reddit thread that was rather helpful: https://www.reddit.com/r/rancher/comments/tfxnzr/cluster_creation_works_in_rke_but_not_rke2/

export KUBECONFIG=/etc/rancher/rke2/rke2.yaml; export PATH=$PATH:/var/lib/rancher/rke2/bin
kubectl get pods -n cattle-system
kubectl logs <cattle-cluster-agent-pod> -n cattle-system

The above describes an easy way to test nodes that are coming up. Keep in mind that RKE2 turns up in a very different way than RKE. After the cloud-init stage, RKE2 binaries and containerd are deployed. It is helpful to be able to monitor pods that are coming up that control agents.

The last issue I encountered was that my /var filesystem didn’t have enough space. After fixing my template I now have a running RKE2 cluster!

PlexStack Part 4 – Our first app: Tautulli

We are now at a point where we can build our first application that requires some persistence. We are going to start with Tautulli, an application that provides statistics about your Plex server.

We assume that you only have a single server. The state of kubernetes storage is interesting. The easiest way is to simply pass a host path in to the pod, but that doesn’t work when you have multiple nodes. Incidentally, what I do for my day job (Portworx Cloud Architect) is solving these problems for customers. More on that later.

We first need to specify a location to store configuration data. I will use /opt/plexstack/tautulli as an example.

mkdir -p /opt/plexstack/tautulli

Next, let’s take a look at the manifest to install tautulli:

apiVersion: apps/v1
kind: Deployment
metadata:
  name: tautulli-deployment
  labels:
    app: tautulli
spec:
  replicas: 1
  selector:
     matchLabels:
       app: tautulli
  template:
    metadata:
      labels:
        app: tautulli
    spec:
     containers:
        - name: tautulli
          image: ghcr.io/linuxserver/tautulli
          env:
            - name: PUID
              value: "999"
            - name: PGID
              value: "999"
            - name: TZ
              value: "America/Los_Angeles"
          ports:
            - containerPort: 8181
          volumeMounts:
            - mountPath: /config
              name: tautulli-config
     volumes:
       - name: tautulli-config
         hostPath: 
            path: /opt/plexstack/tautulli
---
kind: Service
apiVersion: v1
metadata:
  name: tautulli-service
spec:
  selector:
    app: tautulli
  ports:
  - protocol: TCP
    port: 8181
    targetPort: 8181
  type: LoadBalancer
---
kind: Ingress
apiVersion: networking.k8s.io/v1
metadata:
  name: ingress-tautulli
  namespace: plexstack
  annotations:
    cert-manager.io/cluster-issuer: letsencrypt-prod
    kubernetes.io/ingress.class: nginx
spec:
  tls:
    - hosts:
        - tautulli.ccrow.org
      secretName: tautulli-tls
  rules:
    - host: tautulli.ccrow.org
      http:
        paths:
          - path: /
            pathType: Prefix
            backend:
              service:
                name: tautulli-service
                port:
                  number: 8181

There is a lot to unpack here:

  • The first section is the deployment. It defines the application that will run. Line 19 specifies the image.
  • Lines 21 – 26 are environment variables that configure tautulli
  • We can see where we specify the /config directory inside the container to be mapped to a host path (lines 29 – 35).
  • The next section is the service, which looks for pods with an app selector of tautulli.
  • We are also going to provision a load balancer IP address to help with troubleshooting. This could be changed to ClusterIP to be internal only. After all, why go to an ip address when we can use an ingress.
  • Tautulli.ccrow.org must resolve to our rancher node through the firewall (a step we already did in the last blog.

Let’s apply the manifest with:

# create the namespace
kubectl create namespace plexstack

# apply the manifest
kubectl -n plexstack apply -f tautulli.yaml

# check on the deployment
kubectl -n plexstack get all -o wide
NAME                                      READY   STATUS    RESTARTS   AGE   IP           NODE    NOMINATED NODE   READINESS GATES
pod/tautulli-deployment-b4d5485df-f28px   1/1     Running   0          45s   10.42.2.30   rke04   <none>           <none>

NAME                       TYPE           CLUSTER-IP   EXTERNAL-IP   PORT(S)          AGE   SELECTOR
service/tautulli-service   LoadBalancer   10.43.36.8   10.0.1.55     8181:31154/TCP   45s   app=tautulli

NAME                                  READY   UP-TO-DATE   AVAILABLE   AGE   CONTAINERS   IMAGES                         SELECTOR
deployment.apps/tautulli-deployment   1/1     1            1           45s   tautulli     ghcr.io/linuxserver/tautulli   app=tautulli

NAME                                            DESIRED   CURRENT   READY   AGE   CONTAINERS   IMAGES                         SELECTOR
replicaset.apps/tautulli-deployment-b4d5485df   1         1         1       45s   tautulli     ghcr.io/linuxserver/tautulli   app=tautulli,pod-template-hash=b4d5485df

Notice the external IP address that was created for the tautulli-service. You can connect to the app from that IP (be sure to add the 8181 port!) instead of the DNS name.

All configuration data will be stored under /opt/plexstack/tautulli on your node.

Bonus Appplication: smtp

In order for tautulli to send email, we need to set up an SMTP server. This will really show off the power of kubernetes configurations. Take a look at this manifest:

---
 apiVersion: apps/v1
 kind: Deployment
 metadata:
   name: smtp-deployment
   labels:
     app: smtp
 spec:
   replicas: 1
   selector:
      matchLabels:
        app: smtp
   template:
     metadata:
       labels:
         app: smtp

     spec:
      containers:
         - name: smtp
           image: pure/smtp-relay
           env:
             - name: SMTP_HOSTNAME
               value: "mail.ccrow.org"
             - name: RELAY_NETWORKS
               value: "10.0.0.0/8"
           ports:
             - containerPort: 25
---
kind: Service
apiVersion: v1
metadata:
  name: smtp-service
spec:
  selector:
    app: smtp
  ports:
  - protocol: TCP
    port: 25
    targetPort: 25
  type: ClusterIP

You can apply the above manifest. Be sure to change lines 24 and 26 to match your network. Please note: “Your network” really means your internal kubernetes network. After all, why would we send an email from an external source (well, unless you want to, in which case, change line 41 to loadBalancer).

kubectl -n plexstack apply -f smtp.yaml

We now have a working SMTP server! The coolest part of kubernetes service discovery is being able to simply use the name of our service for any application in the same namespace:

Using the service name means that this configuration is portable, no need to actually plug in the cluster IP address that was assigned.

PlexStack Part 3 – External Services and Ingresses

Now we will finally start to get in to some useful configurations for our home PlexStack: Ingresses and external services.

An Ingress is a kubernetes managed reverse proxy that is typically selected through a host. It turns out that your new Rancher cluster is listening on port 80 and 443, but if you have tried to connect by IP address, you will be greeted with a 404 error. An ingress will essentially route a web connection to a particular URL to a service. This means that you will need to configure your DNS service, and likely your router. Let’s look at an example to explain:

I have a service called Uptime Kuma (an excellent status dashboard with alerting) that runs on a raspberry PI. The trouble is, I want to secure the connection with SSL. Now I could install a cert on the Pi, but how would I automatically renew the 90 day cert for let’s encrypt? More importantly, how do I have multiple named services behind a single IP address? Ingresses.

For my example, I have a DNS entry for status.ccrow.org that points to the external IP of my router. I then forward ports 80 and 443 (TCP) to my Rancher node. If I have more than one node, it turns out I can port forward to ANY rancher node.

Next, I have a yaml file that defines 3 things:

  1. A service – an internal construct that kubernetes uses to connect to pods and other things
  2. An endpoint – a kubernetes object that resolves to an external web service
  3. An ingress – A rule that looks for incoming connections to status.ccrow.org, and routes it to the service, and then endpoint. It also contains configurations for the SSL cert information
apiVersion: v1
kind: Service
metadata:
  namespace: externalsvc
  name: pikuma-svc
spec:
  type: ClusterIP
  ports:
    - protocol: TCP
      port: 3001
      targetPort: 3001
---
apiVersion: v1
kind: Endpoints
metadata:
  namespace: externalsvc
  name: pikuma-svc
subsets:
  - addresses:
    - ip: 10.0.1.4
    ports:
    - port: 3001
---
kind: Ingress
apiVersion: networking.k8s.io/v1
metadata:
  name: ingress-pikuma
  namespace: externalsvc
  annotations:
    cert-manager.io/cluster-issuer: letsencrypt-prod
    kubernetes.io/ingress.class: nginx

spec:
  tls:
    - hosts:
        - status.ccrow.org
      secretName: status-tls
  rules:
    - host: status.ccrow.org
      http:
        paths:
          - path: /
            pathType: Prefix
            backend:
              service:
                name: pikuma-svc
                port:
                  number: 3001

A few important elements in the above I will explain:

  • all 3 of these elements will be stored in the externalsvc namespace (which will need to be created!)
  • The ingress >(points to)> the services >(points to)> the endpoint
  • The name of the service and endpoint needs to match on line 5, 17, and 46
  • The service type on line 7 is interesting. If it is set to loadBalancer, then an IP address (from the range that we defined in the previous blog post) would be provisioned to the service. No sense in doing that here.
  • Line 30 defines which cert provisioner we are using. Per our previous blog post, your choices are letsencrypt-prod, letsencrypt-staging, and selfsigned-cluster-issuer. Only use letsencrypt-prod if you are ready to go live. You can certainly use a self-signed issuer if you are using an internal DNS name, or if you don’t mind a self-signed certificate.
  • Lines 36 and 39 must match, and define the dns name that will be the incoming point.

Apply the config with:

kubectl create namespace externalsvc
kubectl apply -f uptimekuma-external.yaml

If you decided to go with the let’s encrypt cert, some verification has to happen. It turns out, the cert-manager will create a certificate request, which will create an order, which will create a challenge, which will spawn a new pod with a key that the let’s encrypt services will try to connect to. Of course if the DNS name or firewall hasn’t been configured, this process will fail.

This troubleshooting example is an excellent reference for tracking down issues (Credit):

$ kubectl get certificate
NAME               READY   SECRET     AGE
acme-certificate   False   acme-tls   66s

$ kubectl describe certificate acme-certificate
[...]
Events:
  Type    Reason     Age   From          Message
  ----    ------     ----  ----          -------
  Normal  Issuing    90s   cert-manager  Issuing certificate as Secret does not exist
  Normal  Generated  90s   cert-manager  Stored new private key in temporary Secret resource "acme-certificate-tr8b2"
  Normal  Requested  89s   cert-manager  Created new CertificateRequest resource "acme-certificate-qp5dm"

$ kubectl describe certificaterequest acme-certificate-qp5dm
[...]
Events:
  Type    Reason        Age    From          Message
  ----    ------        ----   ----          -------
  Normal  OrderCreated  7m17s  cert-manager  Created Order resource default/acme-certificate-qp5dm-1319513028

$ kubectl describe order acme-certificate-qp5dm-1319513028
[...]
Events:
  Type    Reason   Age    From          Message
  ----    ------   ----   ----          -------
  Normal  Created  7m51s  cert-manager  Created Challenge resource "acme-certificate-qp5dm-1319513028-1825664779" for domain "example-domain.net"

$ kubectl describe challenge acme-certificate-qp5dm-1319513028-1825664779
[...]
Status:
  Presented:   false
  Processing:  true
  Reason:      error getting clouddns service account: secret "clouddns-accoun" not found
  State:       pending
Events:
  Type     Reason        Age                    From          Message
  ----     ------        ----                   ----          -------
  Normal   Started       8m56s                  cert-manager  Challenge scheduled for processing
  Warning  PresentError  3m52s (x7 over 8m56s)  cert-manager  Error presenting challenge: error getting clouddns service account: secret "clouddns-accoun" not found

9/10 times, the issue will be in the challenge, and let’s encrypt can’t connect to the pod to verify you are who you say you are.

Now the above isn’t very cool if you only have one service behind your firewall, but if you have half a dozen, it can be very useful because you can have all of your web services behind a single IP. We will be building on using the ingress next by deploying our first application to our cluster..

PlexStack Part 2 – Installing Metallb and Cert-Manager on your new node.

Well, after a lengthy break involving a trip to Scotland, we are back in business! I also learned that I don’t remember as much about VMware troubleshooting as I used to when I encountered a failed vCenter server, but that is a story for another time.

In this post we will be installing a couple bits of supporting software. Metallb is a load balancer which will allow us to give out a block of IP addresses to K8S services, which can be a fairly easy way to interact with kubernetes services. Cert-manager is a bit of software that will allow us to create SSL certificates through let’s encrypt.

MetalLB

There are a couple of things that are worth getting familiar with. First, be comfortable with a text editor. I will be posted a number of files that you will need to copy and modify. Second, I would learn a little about git. I have a repository that you can feel free to clone here.

To install Metallb, we will first install the manifest.

kubectl apply -f https://raw.githubusercontent.com/metallb/metallb/v0.13.4/config/manifests/metallb-native.yaml

Note the static URL above, it may be worth heading over to https://metallb.universe.tf/installation/ for updated instructions.

Next, we need to configure MetalLB by editing the following file:

apiVersion: metallb.io/v1beta1
kind: IPAddressPool
metadata:
  name: first-pool
  namespace: metallb-system
spec:
  addresses:
  - 192.168.0.221 - 192.168.0.229
---
apiVersion: metallb.io/v1beta1
kind: L2Advertisement
metadata:
  name: example
  namespace: metallb-system

Edit the above and change the addresses. The binding is handled by the L2Advertisement. Because the is not a selector that calls out first-pool, all of them are used. Obviously, your addresses should be in the same subnet as your K8s nodes. You can apply the config with:

kubectl apply -f metallb-config.yaml

That’s it, on to cert-manager.

Cert-Manager

the cert manager installation is best done with helm. Helm similar to a package manager for kubernetes. Installation is rather straight forward on Ubuntu. Of course snap seems to be a rather hated tool, but it does make things easy:

sudo snap install helm --classic

And the installation of cert-manager can be done with:

helm repo add jetstack https://charts.jetstack.io
helm repo update
helm install \
   cert-manager jetstack/cert-manager \
   --namespace cert-manager \
   --create-namespace \
   --set installCRDs=true

That’s it! Now we just need to configure it. Configurations will be handled with certificate issuers, which simply tell cert-manager how to generate a certificates. Don’t worry about the specific network plumbing just yet (we will cover that in the next post). I use 3 issuers: prod (let’s encrypt), staging, and self-signed. Take a look at the following and edit as needed:

apiVersion: cert-manager.io/v1
kind: ClusterIssuer
metadata:
  name: letsencrypt-prod
  namespace: cert-manager
spec:
  acme:
    # The ACME server URL
    server: https://acme-v02.api.letsencrypt.org/directory
    # Email address used for ACME registration
    email: chris@ccrow.org
    # Name of a secret used to store the ACME account private key
    privateKeySecretRef:
      name: letsencrypt-prod
    # Enable the HTTP-01 challenge provider
    solvers:
    - http01:
        ingress:
          class: nginx
---
apiVersion: cert-manager.io/v1
kind: ClusterIssuer
metadata:
 name: letsencrypt-staging
 namespace: cert-manager
spec:
 acme:
   # The ACME server URL
   server: https://acme-staging-v02.api.letsencrypt.org/directory
   # Email address used for ACME registration
   email: chris@ccrow.org
   # Name of a secret used to store the ACME account private key
   privateKeySecretRef:
     name: letsencrypt-staging
   # Enable the HTTP-01 challenge provider
   solvers:
   - http01:
       ingress:
         class:  nginx
---
apiVersion: cert-manager.io/v1
kind: ClusterIssuer
metadata:
  name: selfsigned-cluster-issuer
spec:
  selfSigned: {}

The emails above should be changed. It is also worth noting that I have combined 3 different manifests by separating them with ‘—‘ . You can apply the config with:

kubectl apply -f cert-issuer.yaml

That will do it! We are ready to move on to configuring our first service.

PlexStack Part 1 – Installing a single node Kubernetes Cluster

In our last post, I provided an overview of what we are trying to accomplish, so we will dive right into creating a single node Kubernetes cluster.

We are going to use Rancher RKE2 running on Ubuntu 20.04. I will admit that a lot of these choices are due to familiarity. There are a few other options for advanced users.

  • For a multi-node Rancher RKE2 cluster, check out A Return of Sorts
  • For a slightly more manual way, consider using kubeadm (I really liked this post)

We will need to start with a serviceable Ubuntu 20.04 machine. You can really install this on your hypervisor of choice. I would recommend giving your VM 4vCPUs, 12gb of RAM, and a 60GB root drive. Head over to ubuntu.com and grab a manual install of 20.04. The installation is fairly easy, enable SSH and give your VM a static IP address. (And comment if you get stuck and I will set up a tutorial).

Advanced Tip: For those that want to build a ubuntu 20.04 template using VMware customizations, check out this post at oxcrag.net

We should now have a running Ubuntu 20.04 VM that we can SSH to. I will be installing all of the client tools and configurations on this same VM.

Let’s update our VM and install some client tools:

# Update and reboot our server
sudo apt update
sudo apt upgrade -y
reboot

# install git
sudo apt install git

# install kubectl 
sudo snap install kubectl --classic

Installing RKE2

Up until now, I have been a little loose with the terms Rancher and RKE2. Rancher is a management platform that can install on any Kubernetes flavor and acts as a bit of a manager of managers. RKE2 is the Rancher Kubernetes Engine 2, which is a lightweight Kubernetes distro that is easy to install and work with.

Install RKE2 with:

sudo curl -sfL https://get.rke2.io |sudo  INSTALL_RKE2_CHANNEL=v1.23 sh -
###
###
sudo systemctl enable rke2-server.service
sudo systemctl start rke2-server.service

Now let’s install and configure some client tools.

# Snag the configuration file
mkdir .kube
sudo cp /etc/rancher/rke2/rke2.yaml ~/.kube/config
sudo chown ubuntu:ubuntu .kube -R

# Test Kubectl
kubectl get nodes
NAME         STATUS   ROLES                       AGE   VERSION
ubuntutest   Ready    control-plane,etcd,master   15m   v1.23.9+rke2r1

That’s it! We have a single node Kubernetes cluster!